Risk Assessor Resources
Welcome to the City of Cleveland Lead Safe Certification Risk Assessor Resource Page
This page is intended to provide risk assessors with the technical guidance, forms, templates, and program updates necessary to prepare complete and accurate risk assessment reports. Whether you are new to the Lead Safe Certification Program or have years of experience, this page should serve as your primary reference for City expectations.
Our goal is to promote consistency, reduce report revisions, and ensure every Lead Safe Certificate represents a home that can be trusted by residents, property owners, and our community..
Program Updates and Guidance
Find the recording of the Lead Compliance Team meeting with Risk assessors
Purpose
To improve consistency, completeness, and regulatory compliance in risk assessment reports submitted to the City of Cleveland Lead Safe Certification Program, the following reporting requirements and expectations will be implemented effective July 10, 2026.
All risk assessment reports submitted on or after this date shall comply with the requirements outlined in this memorandum. Reports that do not meet these requirements may be returned for correction prior to acceptance.
Regulatory Framework and Definitions
Risk assessments are governed by applicable federal and state requirements, including the U.S. Department of Housing and Urban Development (HUD) Guidelines and Ohio Administrative Code Rule 3701-32-07.
A risk assessment includes an onsite investigation of a residential building for lead-based paint hazards and may include visual assessment, environmental sampling, and recommendations whenever encapsulation, enclosure, or non-abatement controls are recommended.
The City of Cleveland has established the following report expectations to promote consistency among submitted reports and facilitate efficient review.
City of Cleveland
Department of Public Health
Lead Safe Compliance Team
Email: LeadCertCLE@clevelandohio.gov
Phone: 216-664-2274
City of Cleveland Report Expectations
Dust Sampling Clarification Requirements
To ensure consistency among reports OAC Rule 3701-32-07(G)(5) and (6) require dust sampling within residential units and applicable common areas:
- Collect a minimum of nine (9) dust samples per residential unit.
- Collect two (2) samples (window sill and floor, when possible) from each common-area room equivalent (i.e. basements, attics, laundry rooms, hallways, and stairwells.)
- Submit one (1) field blank per property/job (or per unit sampled), or one (1) field blank for every twenty (20) samples collected, whichever is more frequent.
- Submit field blanks as blind samples. Laboratories shall not be informed which samples are blank.
- If window system does not include a window sill, sample nearest horizontal surface.
Floor Plan Requirements
Floor plans shall be legible and shall:
- Match the visual assessment;
- Depict and label all rooms;
- Show dust sample locations;
- Include accessible basements;
- Include accessible attics;
- Include all levels of multi-story properties; and
- Clearly identify windows, doors, stairways, entryways, and other relevant building components.
Exterior Photograph Requirements
Reports shall include:
- Clear, color, uncropped photographs of all four (4) building elevations for residential structures and any additional structures such as garages and sheds.
- Clear photographs of exterior yard areas where occupants are likely to be exposed to bare soil including front, side and rear yard areas, as applicable.
- A photograph taken while standing on the porch that clearly shows the porch floor (see Figure 1).

Interior Photograph Requirements
Reports shall include either:
- At least one labeled photograph of each room; or
- Sufficient labeled photographs to document exclusions, identified hazards, and all applicable impact, friction, and chewable (IFC) surfaces.
Additional photographs of specific components may be used as necessary to document observed conditions. Photographs shall be labeled by room or location, and photographs of all identified deteriorated lead-based paint hazards shall be included.
Exclusion Requirements
To establish consistency among reviewers and submitted reports, exclusions shall be limited to the following categories:
- Uncoated – The component is bare and NOT painted, stained, shellacked, or varnished.
- Enclosed – The component is covered by rigid, durable construction materials that are mechanically fastened to the substrate and function as a permanent barrier between the lead-based paint and the environment as defined by HUD.
- New (Post-1978) – The component is newly installed, post-1978. (A separate component guide shall be provided to clarify how to identify and describe post-1978 components versus original components.)
- Inaccessible – The component could not be physically examined due to an obstruction or restricted access, including furniture, stored materials, or a locked room. Any locked room claimed as inaccessible shall meet all of the following conditions:
- The room is secured and locked (I.e. double cylinder deadbolt, padlock, or combination lock); and
- The report documents the owner’s statement that the area is not accessible to tenants at any time.
Reports shall clearly identify the exclusion category used for each excluded component and provide supporting photographs.
Additional Documentation Requests
The Program reserves the right to request additional information, photographs, documentation, or clarification regarding any component, exclusion, observation, or determination contained within a submitted report.
Additional documentation may be requested when the information provided is insufficient to support the assessor's conclusions or when staff are unable to confidently verify the basis for a reported finding or exclusion.
Examples may include, but are not limited to:
- Photographs that do not clearly depict the component being evaluated;
- Photographs that are blurry, grainy, poorly lit, or taken from excessive distance;
- Insufficient narrative descriptions;
- Inconsistent report findings; or
- Components whose age, material, or condition cannot be reasonably determined from the documentation provided.
Submission of a report does not preclude the Program from requesting additional supporting information as part of the review process.
Control Recommendations
Reports shall include acceptable abatement and interim control recommendations for all documented hazards and potential hazards.
For purposes of this program, a potential hazard is defined as an intact friction, impact, or chewable surface that is presumed or known to contain lead-based paint.
Risk assessors shall:
- Document all hazards and potential hazards;
- Provide appropriate interim control and abatement recommendations for each hazard and potential hazard; and
- Describe actions necessary to prevent the condition from becoming an active lead hazard. (Maintenance and ongoing monitoring)
The inclusion of recommendations for potential hazards is intended to promote long-term compliance and reduce the likelihood of future lead exposure.
XRF Raw Data Documentation
To improve consistency and transparency in risk assessment reports, all reports shall include XRF raw data as an appendix.
For purposes of this program, raw data shall mean the original testing data generated by the XRF instrument and exported directly from the manufacturer’s software. Acceptable formats include manufacturer-generated spreadsheets, sequential reports, or similar electronic exports containing individual test readings and associated testing information.
Reports shall:
- Include the original XRF software-generated data export as an appendix;
- Ensure the appendix contains the complete, unmodified raw data record.
- Include all individual test readings and associated testing information;
- Retain summarized or consumer-friendly result tables within the body of the report, if desired.
The purpose of this requirement is to provide complete documentation of XRF testing results, support report review, and maintain consistency among submitted reports.
Report Organization and Order
To promote consistency and improve review efficiency, reports should follow the organization and section order in the current City of Cleveland Risk Assessment Report Template.
Minor deviations are acceptable; however, required information shall be presented in a logical and organized manner. Reports may be returned for correction if report organization makes required information difficult to locate or review.
Professional Standards
The following practices are prohibited:
- Conducting dust sampling after cleaning performed solely to improve sampling results;
Risk assessors shall not perform or direct any cleaning prior to dust sampling. Property owners, tenants, property managers, or other associated parties may clean before testing; however, a minimum of one (1) hour shall elapse between cleaning and the start of the risk assessment.
- Guaranteeing or implying that a property will “pass”;
- Altering, modifying, or misrepresenting laboratory results; and
- Falsifying observations, findings, or report documentation.
The role of the risk assessor is to identify and evaluate hazards, not to sell certifications. Accurate reporting protects families, property owners, and the integrity of the Lead Safe Certification.
Rev. June 24, 2026
The purpose of this guidance document is to establish clear, consistent standards for how assessors must evaluate and document these components. By understanding industry timelines, architectural histories (including Cleveland's historic district mandates), and specific visual indicators, assessors can ensure their report narratives are defensible, compliant, and structured to pass regulatory staff review without delays or flags. This is only the quick reference guide, please contact the Lead Safe Compliance Team via email leadcertcle@clevelandohio.gov or call 216.664.2274 to obtain a full copy of this guide.
Component
| Pre-1978 Indicators (Assess for Lead) | Post-1978 Indicators (Excludable as New) |
|---|---|---|
| Windows | Wood sash, single-pane, aluminum frame, rope-pulley system, paint buildup | Vinyl/PVC frame, double-pane, tilt-in sash, glass block, no paint |
| Interior Doors | Solid wood, heavy weight, mortise hardware, wood grain, multi-layer paint with corner buildup | Hollow-core, lightweight, smooth MDF face, molded or routed profiles, modern cylindrical bore, factory powder coat or primer |
| Exterior Doors | Solid wood, mortise lockset, wood checking, multi-coat paint, no weatherstrip | Fiberglass or insulated steel, compression weatherstrip, modern hardware, energy label |
| Porch Floors | Tongue & groove, tight boards, no gaps, painted, Heart Pine/fir/cypress | Spaced deck boards (PT lumber), composite/Trex boards, or PVC — no paint |
| Porch Railings | Turned wood balusters OR heavy, straight square wood spindles (2x2", 3x3", 4x4") • Thick multi-layer paint buildup showing signs of checking or alligatoring. Wider historic on-center spacing (gaps exceeding 4 inches) | PVC/vinyl, aluminum system or standard nominal 2x2” square square-edge pressure-treated wood, modern fasteners or deck screws. Tight safety spacing (gaps under 4 inches) |
| Garage Doors | Solid wood or heavy plywood construction. | Sectional roll-up design, embossed steel or fiberglass faces, uniform factory finish, interior foam core, rubber bottom seals. |
Per Cleveland’s Lead Safe Certification requirements and OAC Rule 3701-32, components may be excluded from testing only when clearly documented as one of the following:
- New (post-1978 installation)
- Uncoated (no paint or surface coating present)
- Enclosed (not accessible for contact)
- Inaccessible
Importance of Record Keeping:
Although this document provides exclusion options for “New” components it is worth noting that record keeping is the most reliable way to ensure safety, reduce financial and legal liabilities, and build trust. Best practices include:
- Purchase/installation receipts and permits
- Documented inspections and test results
- Using lead safe practices and documenting lead safe practices performed
Purpose
This memo serves as a formal clarification regarding proper completion of Section C: Interior and Exterior Surfaces on the Ohio Department of Health (ODH) HEA 7729 – Lead Visual Assessment Form.
Recent report reviews have identified a recurring issue in which inspectors list generalized descriptions such as “All windows,” “All doors,” or “All chewable surfaces” instead of identifying individual components and their specific conditions.
While these entries indicate the intent to perform a thorough inspection, they do not meet the documentation standards required by the Ohio Administrative Code (OAC 3701-32-07) or the HUD Guidelines for the Evaluation and Control of Lead-Based Paint Hazards (Chapter 5, Risk Assessment).
Regulatory Basis
1. Ohio Administrative Code 3701-32-07(G)(3)
A lead risk assessor shall perform a visual assessment of the interior and exterior of the residential unit, child care facility, or school and identify, on forms prescribed by the director:
- Overall building condition;
- Areas of bare soil;
- Interior and exterior surfaces with deteriorated paint;
- Painted surfaces that are impact points or subject to friction; and
- Chewable surfaces.
2. Key Expectations for Visual Assessment:
The purpose of the visual assessment is to:
“Locate and document the specific location and approximate size of each instance of deteriorated paint, friction-surface hazards, impact-surface hazards, and chewable-surface hazards.” HUD emphasizes that this information must be detailed enough for the report to stand alone as a complete record — including component-by-component identification of locations, conditions, and tested surfaces.
Risk Assessors must clearly document the specific location and condition of each component visually assessed and/or tested. This level of detail can be documented in on of two ways:
- Insert the component-by-component breakdown directly into form HEA 7729, ensuring that the Notes section includes corresponding long-term and interim control options for any identified hazards.
- Insert the component-by-component breakdown within the Potential Hazards Table, and use Form HEA 7729 to Identify general room equivalents (e.g., Kitchen, Living Room, Bedroom 1, etc.)
This includes identifying:
- Each room equivalent and its condition (intact or deteriorated)
- Each side (A, B, C, D) of the structure, noting deteriorated, friction, impact, or chewable surfaces
- All areas of the property, including basements, attics, porches, exterior walls, fences, garages, and outbuildings, where painted or coated surfaces may be present
- Bare soil areas as applicable
3. Required Level of Detail
Each visually assessed and/or tested surface must include:
- Room equivalent (e.g., Bedroom 1, Kitchen, Hallway)
- Wall side (Side A, B, C, or D)
- Specific components (e.g., Windowsill, Door Frame, Baseboard, Radiator)
Condition (Intact / Deteriorated)
Example of Insufficient Entry:
| Example of Compliant Entry:
|
|
|
4. Friction, Impact, and Chewable Surfaces
Per HUD and EPA (40 CFR 745.63 and 745.65):
- Friction surfaces include windowsills, stair treads, painted floors, or shelves subject to abrasion.
- Impact surfaces include door frames, baseboards, and walls repeatedly struck by doors or objects.
- Chewable surfaces include windowsills, railings, and other surfaces showing bite marks or identified risk of mouthing by children under six.
Inspectors must evaluate and document these surfaces individually, noting whether the paint is intact or deteriorated and whether dust sampling was performed beneath these areas (as required to confirm or rule out a hazard).
5. Reference Resources
- HUD Guidelines, Chapter 5: Risk Assessment and Reevaluation
- Section II.D – Visual Assessment
- Section IV – Friction and Impact Surfaces
- Table 5.4 – Illustrative List of Painted Components
- Ohio Administrative Code 3701-32-07 and 3701-32-15
- ODH HEA 7729 Visual Assessment Form
Implementation
Effective immediately, all new reports should begin reflecting this level of detail under Section C. We recognize this is an adjustment, and our team will work collaboratively with risk assessors over the next several weeks to ensure consistency. During this transition period, our focus will be on feedback and improvement but reports that do not move toward compliance may still receive additional information required notices.
Visual Example Table: Proper Documentation of Section C (HEA 7729)
Disclaimer:
The example provided solely for illustration and training purposes. Each property will have its own unique layout, construction type, and component conditions. Inspectors must adapt their documentation to accurately reflect the site-specific details observed during their inspection and ensure that the recorded information corresponds directly to the property being assessed.
BEFORE (Incorrect):

AFTER:

How To Complete A Risk Assessment
A lead risk assessor plays a critical role in protecting children and families from lead exposure. The purpose of a risk assessment is to identify and evaluate lead-based paint hazards and provide clear, accurate recommendations for hazard control. Accurate reporting protects families, property owners, and the integrity of the Lead Safe Certification Program.
Pursuant to Ohio Administrative Code, a lead risk assessor shall perform a visual assessment of the interior and exterior of the residential unit, child care facility, or school and identify, on forms prescribed by the Director:
- Overall building condition
- Areas of bare soil
- Interior and exterior surfaces with deteriorated paint
- Painted surfaces that are impact points or subject to friction
- Chewable surfaces
The guidance below is organized by report section and is intended to help risk assessors prepare complete, accurate, and internally consistent reports that meet City of Cleveland program expectations.
Property Characteristics
The Property Characteristics section should provide a concise description of the dwelling and any features that affect the risk assessment. This section gives the reviewer an overview of the property before reviewing the visual assessment, floor plans, and sampling results.
Describe the physical characteristics of the property and include any atypical features or conditions that may impact the assessment.
Include the following, when applicable:
- Construction style (e.g., Cape Cod, Colonial, Bungalow, Ranch)
- Approximate year built
- Number of stories
- Number of dwelling units
- Number of bedrooms and bathrooms (if relevant)
- Presence of a basement and/or attic (finished or unfinished)
- Garage or accessory structures (attached/detached and approximate year built, if known)
- Primary exterior materials (wood siding, aluminum siding, brick, vinyl, stucco, etc.)
- Window type (wood, vinyl, aluminum, etc.)
- Occupancy status at the time of the assessment
- General condition of the property
- Any unusual building configuration or layout
- Any discrepancies between observed conditions and public records (e.g., County Auditor, Rental Registration, or other available records)
Examples of unusual conditions
Document any circumstances that would help explain the property layout or assessment, such as:
- County records indicate a duplex, but the property appears to function as a single-family dwelling.
- A finished attic is being used as living space.
- A detached garage is present but not reflected in public records.
- An addition, enclosed porch, or converted space affects the floor plan.
- Shared basements, entrances, or common areas in multi-unit properties.
Template Example: The subject property is a [single-family/duplex/multi-family] residential dwelling constructed in approximately [year]. The building consists of [number] story(ies) with [number] bedroom(s) and [number] bathroom(s). The property includes [basement], [attic], and [attached/detached/no] garage. The dwelling was [occupied/vacant] at the time of the assessment.
The exterior is primarily constructed of [materials] with [window type] windows. Entrances are located on Sides A, B, C, and/or D, with [porches/decks/stairs] as applicable. The surrounding area is primarily [residential/commercial/mixed-use].
Any unique building characteristics or discrepancies between observed conditions and available public records are documented below.
Areas Not Accessible
Areas that cannot be physically examined during the risk assessment must be clearly documented. Components should only be classified as Inaccessible when they genuinely cannot be evaluated at the time of the assessment.
What qualifies as inaccessible?
A component may be classified as inaccessible when it cannot be physically examined due to an obstruction or restricted access, including:
- Furniture or stored materials that prevent access.
- Locked rooms or areas.
- Other physical barriers that prevent inspection.
An area should not be classified as inaccessible simply because it was not inspected or because access was not attempted.
Requirements for Locked Rooms
A locked room may only be classified as inaccessible when all of the following conditions are met:
- The room is secured by a locking mechanism (e.g., double-cylinder deadbolt, padlock, or combination lock).
- The report documents the owner's statement that the room is not accessible to tenants at any time.
- Photographs are provided showing the locked entrance.
Documentation
For every inaccessible area, the report should include:
- The specific location or component.
- The reason access was not possible.
- Supporting photographs demonstrating why the area could not be inspected.
When Additional Access Is Required
If an area does not meet the criteria for being classified as inaccessible, the assessment is considered incomplete for that area. Additional access may be required before the report can be approved.
Examples include:
- A bedroom or other room was inaccessible because an occupant declined entry.
- Photographs do not adequately document why access was restricted.
- A room is claimed to be inaccessible but does not meet the requirements for a permanently restricted area.
- Temporary obstructions (such as furniture or stored belongings) prevented the inspection but could reasonably be moved or rescheduled.
In these situations, an additional site visit may be necessary to complete the assessment.
Building Maintenance & Renovations
This section should summarize the maintenance history and renovations that are known, documented, or readily observable during the assessment. The information provided here should help explain the current condition of the property and support later determinations made in the visual assessment, exclusions, and potential hazards.
Document maintenance or renovation activities reported by the owner or property representative, as well as improvements that are clearly observable during the assessment.
Examples include:
- Replacement windows (e.g., vinyl windows throughout the property)
- Glass block basement windows
- New siding or exterior cladding
- New porches, decks, or stairs
- Replacement entry or interior doors
- Enclosed flooring (e.g., vinyl plank flooring, ceramic tile)
- Aluminum coil stock enclosing exterior window casings or trim
- Replacement railings, columns, or other exterior components
- Other newly installed building components
When documenting renovations, be as specific as possible. For example:
Side A and Side B entry doors are new fiberglass pre-hung door systems. Side C contains a new metal entry door with the original wood frame and threshold remaining.
Providing this level of detail helps explain why some components may later be excluded as New (Post-1978) while adjacent components remain subject to evaluation.
Include, when applicable:
- Maintenance history provided by the owner or property representative.
- Renovations or remodeling activities.
- Replacement windows and doors.
- Newly installed building components.
- Documentation supporting Post-1978 components.
- Observable improvements that affect the assessment.
- Any renovation that may affect presumed lead-based paint or the identification of lead hazards.
Best Practice
The information in this section should be consistent with the remainder of the report. Renovations described here should align with the visual assessment, floor plans, exclusions, photographs, and any components identified as New (Post-1978).
Executive Summary
The Executive Summary should provide a clear, concise conclusion of the risk assessment. It should summarize the assessment activities performed, identify the lead hazards that were found (or not found), and clearly state the overall findings.
This section should be supported by the remainder of the report. The conclusions presented here must be consistent with the visual assessment, photographs, XRF results, environmental sampling, laboratory results, floor plans, and all other report sections.
The Executive Summary should allow the reader to understand the outcome of the assessment without reviewing the entire report.
Include the following:
Assessment Activities Performed
Provide a brief summary of the activities completed during the assessment, as applicable:
- Completion of a questionnaire to identify potential sources of lead exposure.
- Visual inspection of the interior and exterior painted surfaces.
- If a visual-only assessment was performed (no XRF): State that the visual inspection was conducted under the presumption that all coated surfaces may contain lead-based paint.
- Component-by-component evaluation of impact, friction, and chewable surfaces.
- Use of a portable X-ray fluorescence (XRF) analyzer to determine the presence or absence of lead-based paint, when applicable.
- Collection of environmental samples (dust wipe, soil, and/or paint-chip samples, as applicable).
- Preparation of the risk assessment report documenting the observations, testing, and findings.
Findings
Clearly state whether lead-based paint, lead-based paint hazards, or both were identified.
When XRF testing is performed:
- Differentiate between lead-based paint (intact coated surfaces confirmed to contain lead) and lead-based paint hazards (deteriorated lead-based paint, lead-contaminated dust, lead-contaminated soil, or other identified hazards).
When XRF testing is not performed:
- State that coated surfaces are presumed to contain lead-based paint and explain whether lead hazards were identified based on the visual assessment and environmental sampling.
Avoid ambiguous statements such as:
"Lead-based paint and lead-based paint hazards were present."
Instead, clearly identify:
- Where hazards were identified.
- Whether hazards require interim controls or abatement.
- Whether no hazards were identified despite the presence of intact lead-based paint.
Best Practice
The Executive Summary should be the final section completed after the remainder of the report has been reviewed for internal consistency. Before finalizing the report, verify that the conclusions accurately reflect:
- Visual assessment findings.
- Photographs.
- XRF and laboratory results.
- Environmental sampling.
- Potential hazards.
- Exclusions.
- Recommended interim controls or abatement activities.
Any conflicting statements between the Executive Summary and the remainder of the report may result in a request for revisions.
Visual Assessment
The visual assessment is the foundation of the risk assessment report and the most detailed portion of the evaluation. Because the City of Cleveland permits the presumption of lead-based paint, the visual assessment must accurately identify and document all actual hazards, potential hazards, and excluded components. When XRF testing is not performed, the visual assessment becomes the primary method for identifying painted surfaces that may present a lead hazard.
Presumption vs. XRF Testing
The City permits risk assessments to be completed without the use of a portable X-ray fluorescence (XRF) analyzer. In these cases, coated surfaces are presumed to contain lead-based paint unless they can be excluded for another reason (e.g., new, uncoated, enclosed, or inaccessible).
While an XRF analyzer is not required, it offers several advantages:
- Confirms whether painted surfaces contain lead-based paint.
- Prevents unnecessary repairs or replacement of components that do not contain lead.
- Allows owners to permanently identify lead-free components.
- May reduce the overall cost of achieving or maintaining a Lead Safe Certification.
- Helps distinguish intact lead-based paint from painted surfaces that do not contain lead.
This guidance focuses primarily on conducting a visual assessment without the use of an XRF analyzer.
Purpose of the Visual Assessment
The purpose of the visual assessment is to identify and document the specific location and approximate size of each instance of:
- Deteriorated paint.
- Impact surfaces.
- Friction surfaces.
- Chewable surfaces.
- Areas of bare soil.
- Other observable conditions that may contribute to lead hazards.
HUD emphasizes that the report should contain sufficient detail to stand alone as a complete record of the assessment. Documentation should identify each component, its location, its condition, and, when applicable, any testing performed.
What Must Be Documented
Not every painted or coated component is required to be documented as a potential hazard. Documentation should focus on components that present a lead hazard or have the potential to become one.
Components should be documented in one of the following categories:
Actual Hazards
Actual hazards include:
- Any deteriorated painted or coated surface that is known or presumed to contain lead-based paint.
- Environmental lead hazards identified through dust or soil sampling.
Deteriorated paint should be documented regardless of whether the component is an impact, friction, or chewable (IFC) surface.
Potential Hazards
Potential hazards include:
- Intact coated impact, friction, and chewable (IFC) surfaces that are presumed to contain lead-based paint because XRF testing was not performed.
- Any intact surface confirmed by XRF or laboratory analysis to contain lead-based paint, regardless of whether it is an IFC surface.
For example:
- An intact painted door jamb is documented because it is a friction surface.
- An intact painted window through is documented because it is an impact surface.
- An intact interior plaster wall is not documented as a potential hazard solely because it is painted. However, if XRF testing confirms the wall contains lead-based paint, it should be documented as a potential hazard even though it is not an IFC surface.
Excluded Components
Components may be excluded when they are:
- Uncoated.
- New (Post-1978) or otherwise documented as replacement components. (see New Components Guide under Program Updates Menu)
- Permanently enclosed.
- Inaccessible and documented in accordance with program guidance.
Documentation throughout the report should be internally consistent and should not contradict the photographs, floor plans, exclusions, executive summary, or other report sections.
Areas to be Evaluated
The visual assessment should include all accessible areas of the property, including:
- All interior rooms.
- Basements.
- Attics.
- Front, rear, and side porches.
- Garages and accessory structures.
- Exterior elevations.
- Common areas in multi-family buildings.
- Areas of bare soil.
Documenting Findings
Visual findings should be documented on the Ohio Department of Health HEA 7729 Lead Visual Assessment Form or an equivalent worksheet that provides the same level of detail.
Documentation should identify:
- Room equivalent or location.
- Building side (A, B, C, or D), where applicable.
- Specific component.
- Condition of the component.
- Appropriate interim control or abatement recommendation.
Each component should be individually identified rather than grouped together whenever practical.
Using HEA 7729
When using the HEA 7729:
- I (Intact) indicates an intact coated component.
- Intact coated impact, friction, and chewable surfaces should be documented as potential hazards when lead is presumed.
- Components confirmed by XRF or laboratory analysis to contain lead-based paint should also be documented as potential hazards, even if they are not IFC surfaces.
- D (Deteriorated) indicates deteriorated paint and should be documented as an actual hazard unless XRF or laboratory analysis demonstrates that the coating does not contain lead.
If using an equivalent reporting format, clearly distinguish between:
- Actual Hazards (deteriorated lead-based paint or presumed lead-based paint), and
Potential Hazards (intact coated impact, friction, or chewable surfaces).
Reporting Requirement: The HEA 7729 Lead Visual Assessment Form is required as part of every submitted risk assessment report. If you use your own visual assessment worksheet or reporting format, you must still include the HEA 7729 in the report. Complete the form by listing all room equivalents and inspected areas, and include a note directing the reviewer to your detailed component-by-component visual assessment.
Best Practices
- Document components individually using consistent terminology.
- Ensure photographs, floor plans, exclusions, and narrative sections support the visual assessment.
- Review the report for internal consistency before submission.
- Remember that the visual assessment should allow another reviewer to understand the condition of the property without revisiting the site.
Commonly Missed Components
Include a checklist of components that are frequently omitted from reports, such as:
- Floors (impact surfaces)
- Door systems (door panel, jamb, casing, threshold, stop)
- Stair treads, risers, stringers, and handrails
- Porch floors, ceilings, railings, balusters, columns, and skirting
- Garage components
- Foundation walls
- Window wells
- Exterior entry doors on all elevations
- Common area components in multi-family properties
Floor Plans
Purpose
The floor plan serves as the roadmap for the entire risk assessment. It should allow a reviewer to understand the layout of the dwelling, verify where dust samples were collected, and confirm that the visual assessment accounts for every accessible area of the property. The floor plan should be consistent with all other portions of the report, including the visual assessment, photographs, dust sample locations, and narrative.
Floor Plan Requirements
Floor plans shall be clear, legible, and accurately represent the dwelling. At a minimum, they should:
- Match the visual assessment and all other report sections.
- Depict and label every room or room equivalent.
- Show the location of all dust wipe samples.
- Include all accessible basements.
- Include all accessible attics.
- Include every level of a multi-story dwelling.
- Clearly identify:
- Windows
- Doors
- Stairways
- Entryways
- Other significant building components when necessary for interpretation.
Consistency Matters
A reviewer should be able to compare the floor plan with the visual assessment and photographs without finding discrepancies.
Examples of inconsistencies include:
- Rooms shown on the floor plan but omitted from the visual assessment.
- Dust samples documented in locations that do not appear on the floor plan.
- Exterior or interior doors documented during the assessment but missing from the floor plan.
- Stairways present in the dwelling but not depicted.
- Accessible attics or basements omitted from the floor plan.
If an accessible room or building component is not shown on the floor plan, it cannot be verified during report review and may result in a request for additional information.
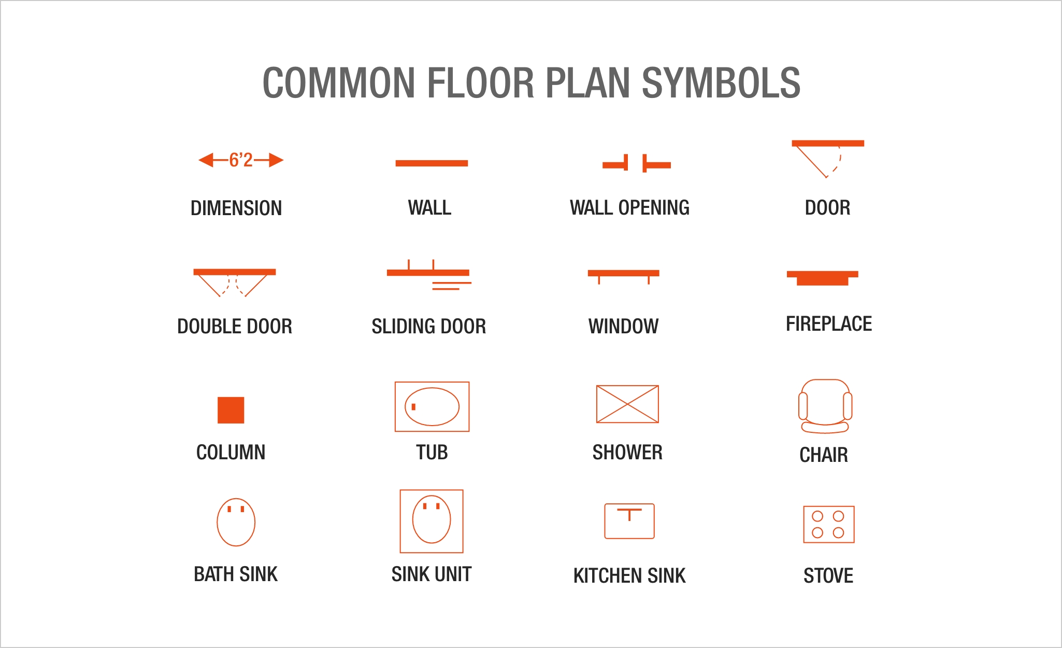
Dust Sampling
Purpose
Dust sampling evaluates whether lead-contaminated dust hazards are present within the dwelling. Proper sample collection and documentation are essential for determining whether a property meets Ohio's lead hazard standards.
To ensure consistency among reports, Ohio Administrative Code Rule 3701-32-07(G)(5) and (6) establishes minimum sampling requirements for residential units and applicable common areas.
Dust Sampling Requirements
Risk assessors shall:
- Collect a minimum of nine (9) dust wipe samples from each residential unit.
- Collect two (2) dust samples from each common-area room equivalent whenever possible:
- One floor sample.
- One window sill sample.
- If a window system does not contain a window sill, collect the sample from the nearest horizontal surface.
- Submit:
- One (1) field blank per property/job (or per sampled unit), or
- One (1) field blank for every twenty (20) samples collected,
- whichever is more frequent.
- Submit field blanks as blind samples. The analytical laboratory shall not be informed which samples are field blanks.
Common Areas
When common areas are present, sampling should include applicable room equivalents such as:
- Basements
- Attics
- Laundry rooms
- Hallways
- Stairwells
Additional common areas may require sampling depending on the building configuration.
Documentation
The report should clearly identify:
- Each sample location.
- Sample identification numbers.
- Corresponding locations on the floor plan.
- Laboratory results.
- Field blanks.
Sample locations should be documented consistently throughout the report. The floor plan, laboratory chain of custody, field forms, and narrative should all identify the same locations.
Best Practices
- Label sample locations clearly on the floor plan.
- Use consistent room names throughout the report.
- Verify that every sample listed in the laboratory report appears on the floor plan.
- Confirm that all required common-area samples are included.
- Review sample counts before submitting the report to ensure minimum requirements have been met.
Common Floor Plan Deficiencies
- Missing basement or attic.
- Missing dust sample locations.
- Missing windows, doors, or stairways.
- Floor plan does not match the visual assessment.
- Rooms are unlabeled or illegible.
- Multi-story property only includes one floor.
Common Dust Sampling Deficiencies
- Fewer than nine samples collected per unit.
- Missing common-area samples.
- Field blanks omitted.
- Sample locations do not match the floor plan.
- Window sill sample omitted without documenting the nearest horizontal surface.
- Sample numbering inconsistent between the floor plan, field forms, and laboratory report.
Interim controls mean a set of measures designed to temporarily reduce human exposure or likely human exposure to lead hazards. Interim controls include specialized cleaning, repairs, painting, temporary containment, ongoing lead hazard maintenance activities, and the establishment and operation of management and resident education programs.
Lead abatement means a measure or a set of measures, designed for the single purpose of permanently eliminating lead hazards. Lead abatement includes all the following:
- Removal of lead-based paint and lead-contaminated dust. This includes stripping or scraping paint from the surface and repainting.
- Permanent enclosure or encapsulation of lead-based paint. Examples of enclosure are installation of drywall over lead coated surfaces or wrapping and siding exterior lead painted surfaces. Encapsulation if the application of an ODH approved liquid coating to seal lead coated surfaces.
- Replacement of surfaces or fixtures painted with lead-based paint such as windows, door and trim work.
- Removal or permanent covering of lead-contaminated soil.
- Preparation, cleanup, and disposal activities associated with lead abatement.
| Methods of Interim Controls for Lead-Based Paint (LBP) Hazards | |
| Hazard | Interim Control |
| LBP – Deteriorated | Paint Film Stabilization (PFS) |
|
|
|
|
| LBP -Friction Surface | Treat to Minimize Friction |
| |
| |
| LBP – Impact Surface | Treat to Prevent Impact |
|
|
|
|
| LBP – Chewed | Cover to Prevent Chewing |
| |
| |
| Lead Contaminated Interior Dust | Environmental Cleaning/ HUD Cycle |
| |
| |
| Lead Contaminated Bare Soil | Cover or Restrict Access |
| |
| |
| |
Abatement Methods | |
| Lead Paint Abatement | |
| |
| |
| |
| |
| |
| Using Ohio Department of Health (ODH) approved liquid coating – 20-year warranty. | |
| |
| |
| Contaminated Soil Abatement | |
|
|
| |
Forms and Templates
Below are templates and forms you may need to include in the risk assessment report.


